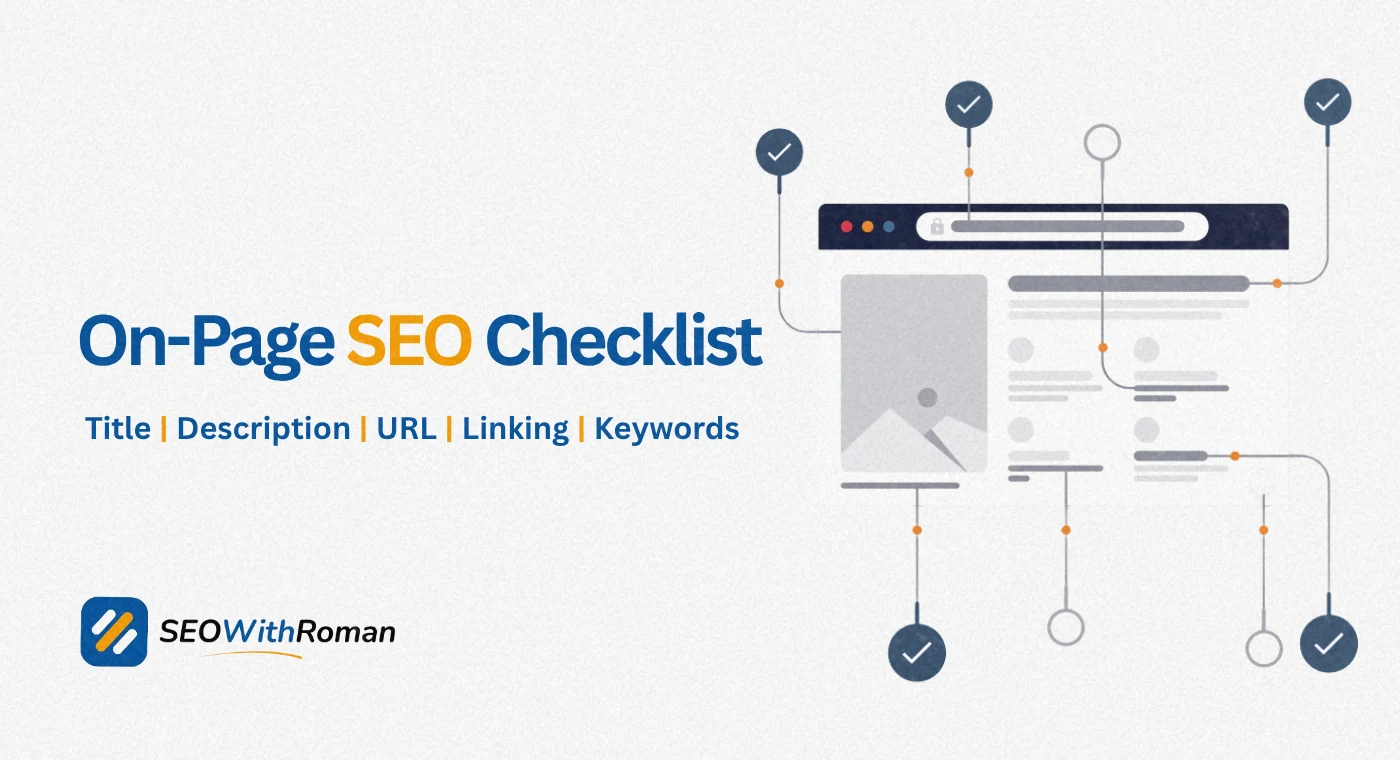
- On-page SEO checklist for every blog post covers 15 critical tasks that must be completed before hitting publish
- Title tag optimisation, search intent matching, and internal linking are the three highest-impact items on any blog SEO checklist
- Most bloggers lose rankings not because of bad content but because they skip basic on-page SEO best practices
- A properly optimised blog post tells Google exactly what the page is about, who it serves, and why it deserves to rank
- This checklist applies to every blog post regardless of topic, industry, or website platform
1 What Is On-Page SEO and Why Every Website Needs Its Own Checklist
Publishing a blog post without running through an on-page SEO checklist is like opening a shop and forgetting to put a sign above the door. The content is there. The effort is there. But nobody can find it.
On-page SEO refers to all the optimisations you make directly on a webpage to help Google understand what the page is about, who it is for, and why it deserves to appear in search results. Unlike off-page SEO which involves backlinks from other websites, on-page SEO is entirely within your control.
The reason every blog post needs its own checklist is that Google evaluates pages individually, not websites as a whole. A brilliantly optimised homepage does not help your blog post rank. Each post needs its own keyword target, its own title tag, its own meta description, its own internal links, and its own image optimisation.
In many years of working on SEO campaigns across multiple industries, I have seen more ranking failures caused by skipped on-page basics than by weak backlinks or low domain authority. The good news is that on-page SEO is the most controllable part of your entire search strategy. Fix it on every post and you eliminate the most common reason content fails to rank.
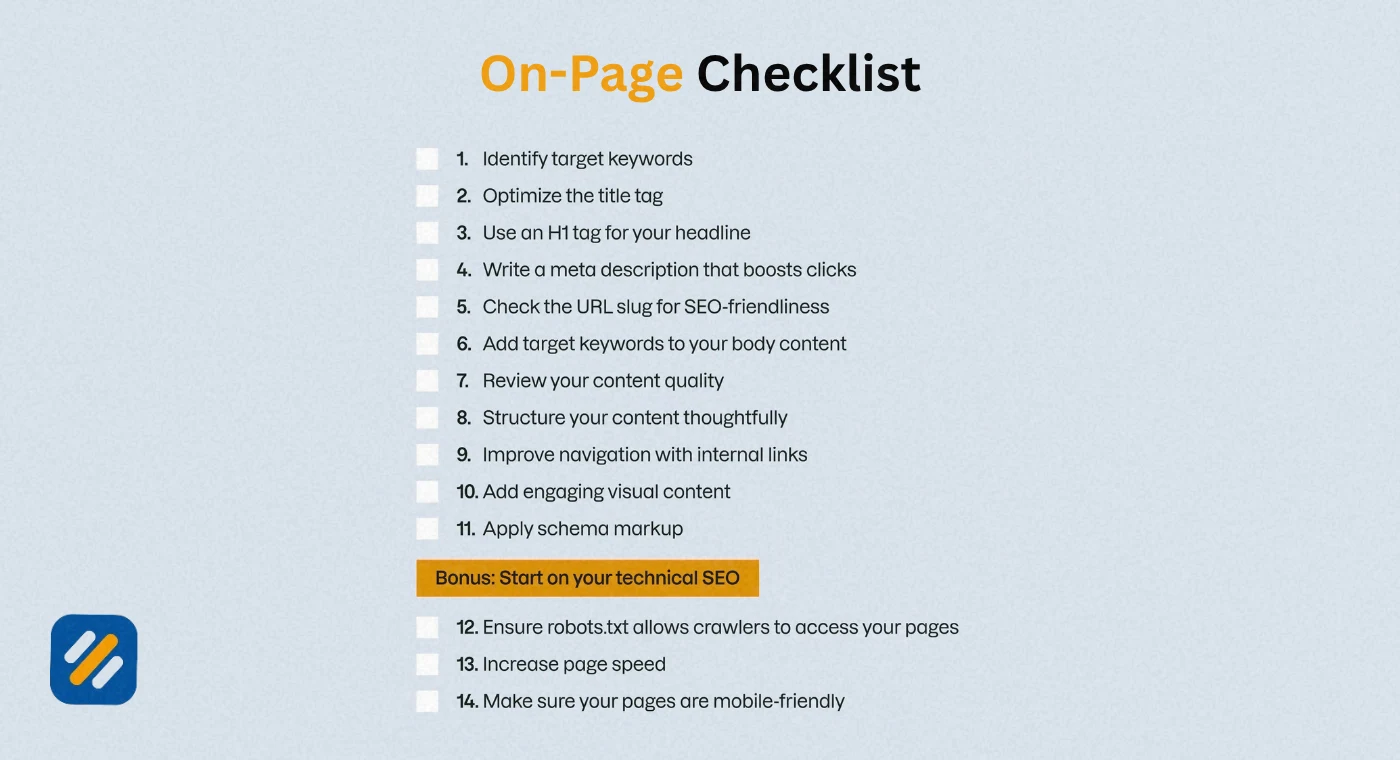
Here is the complete on-page SEO checklist for every blog post you publish, in the exact order you should work through it.
2 Pre-Writing Checklist | Do This Before You Write a Single Word
Most bloggers treat SEO as something they apply after writing. That backwards approach explains why so much well-written content sits on page five indefinitely. On-page SEO starts before you open a blank document.
Checklist Item 1: Confirm Your Target Keyword Has Real Search Volume
Every blog post needs one clearly defined primary keyword before writing begins. Use Google Keyword Planner, Ahrefs free keyword generator, or the free version of Semrush to confirm your target keyword has at least 100 monthly searches in your target country.
Do not write first and find a keyword later. Writing first produces content shaped by what you know rather than what people are searching for. The gap between those two things is where most blog traffic disappears.
Checklist Item 2: Check the Keyword Difficulty Score
A keyword with 10,000 monthly searches and a difficulty score of 80 is worthless to a new website. A keyword with 500 monthly searches and a difficulty score of 12 is an immediate ranking opportunity.
For a website under 12 months old with limited backlinks, target keywords with a difficulty score below 25. Use Ahrefs, Semrush, or the free Moz Keyword Explorer to check difficulty before committing to a topic.
Checklist Item 3: Analyse Search Intent Before Writing
Search intent is the most underused concept in beginner SEO. It refers to what the person typing that keyword actually wants to find when they search.
Google already knows the intent for every major keyword. You can see it by searching your target keyword and studying the top three results. Are they how-to guides? Comparison articles? Definition posts? Lists of tools? Match that format because Google is showing you what type of content it considers the best answer for that query.
Writing a long guide when the top results are all quick definition posts means your article is fighting the intent signal Google has already established. Match the intent and you start with a significant advantage.
| Search Intent Type | What the Searcher Wants | Content Format That Ranks |
|---|---|---|
| Informational | To learn something | How-to guides, explainers, definitions |
| Navigational | To find a specific website | Brand pages, login pages |
| Commercial | To compare options before buying | Comparison articles, best-of lists, reviews |
| Transactional | To complete a purchase or action | Product pages, landing pages, pricing pages |
| Local | To find a nearby business or service | Location pages, Google Business Profile |
3 Title Tag Optimisation | The Single Most Important On-Page Element
your title tag is the first thing Google reads and the first thing a searcher sees before clicking. It is the single most impactful on-page SEO element you control.
Checklist Item 4: Write a Title Tag That Contains Your Primary Keyword
Your primary keyword must appear in your title tag. Ideally it appears within the first four words. Google gives greater weight to keywords that appear earlier in the title because it interprets front-loaded keywords as the main subject of the page.
Weak title: "A Guide to Understanding On-Page SEO for Your Blog"
Strong title: "On-Page SEO Checklist for Every Blog Post: The Complete Guide"
The strong version leads with the keyword, includes a clear content promise, and gives the reader an immediate reason to click.
Checklist Item 5: Keep Your Title Tag Under 60 Characters
Google displays title tags up to approximately 600 pixels wide which equates to roughly 60 characters including spaces. Titles that exceed this limit get cut off with three dots in search results, which looks unprofessional and reduces click-through rates.
Before publishing, paste your title into a character counter or check it in Rank Math's snippet preview inside WordPress. Both show you exactly how your title will appear in Google results before it goes live.
Checklist Item 6: Add a Power Word or Value Signal
Numbers, power words, and specificity in title tags consistently improve click-through rates. Words like "complete," "proven," "step by step," "in 2026," and "for beginners" all signal specific value and reduce the reader's uncertainty about whether the article matches their need.
Compare these two titles for the same article:
Without power word: "On-Page SEO Checklist"
With power word: "The Complete On-Page SEO Checklist for Every Blog Post That Actually Ranks"
The second version communicates completeness, specificity, and a direct benefit. That difference in clicks compounds over thousands of impressions.
4 Meta Description Optimisation | Your 160-Character Sales Pitch
Your meta description does not directly affect where you rank. But it directly affects how many people click through to your page from wherever you rank. A weak meta description on a position three result can lose to a strong meta description at position five simply because the position five result looked more relevant and compelling.
Checklist Item 7: Write a Unique Meta Description for Every Blog Post
Every blog post needs its own meta description. Never leave it blank and never duplicate it from another page. When you leave it blank, Google selects an excerpt from your page content. That auto-selected excerpt is rarely the most compelling or most keyword-relevant sentence on your page.
Checklist Item 8: Include Your Primary Keyword Naturally
Google bolds the words in meta descriptions that match what the searcher typed. When your meta description contains your target keyword, those words appear bold in the search result, making your listing more visually prominent and more relevant-looking to the searcher.
Checklist Item 9: Stay Under 160 Characters and Include a Benefit
Keep your meta description under 160 characters to prevent truncation. Within that limit, include your primary keyword, a specific benefit the reader gets from the article, and an implicit call to action.
Strong meta description formula: [What the article covers] + [Specific benefit] + [Trust signal or action phrase]
Example: "Follow this complete on-page SEO checklist for every blog post. Covers 15 proven tasks from keyword research to schema markup. Written by a Senior SEO Specialist."
5 URL Structure | The SEO-Friendly URL Checklist
URL slugs are one of the most commonly ignored on-page SEO elements and one of the easiest to get right. A clean, keyword-focused URL tells both Google and readers exactly what the page covers before they even click.
Checklist Item 10: Use Your Primary Keyword in the URL Slug
Your URL slug is the part of the web address after your domain name. For a post targeting "on-page SEO checklist for every blog post" the ideal URL slug is: /on-page-seo-checklist-blog-post
Keep it short, descriptive, and keyword-focused. Remove stop words like "a," "the," "and," and "for" that add length without adding meaning.
| Poor URL Structure | Strong URL Structure | Why It Matters |
|---|---|---|
| /blog/post-1 | /on-page-seo-checklist | Tells Google the topic immediately |
| /2026/04/22/article-title | /seo-checklist-blog-post | Clean, timeless, no date to become stale |
| /blog?p=142 | /keyword-research-free | Human-readable and keyword-relevant |
| /the-complete-guide-to-doing-on-page-seo | /on-page-seo-guide | Shorter, cleaner, same meaning |
| /on-page_seo_checklist | /on-page-seo-checklist | Hyphens not underscores separate words |
Checklist Item 11: Never Change a Published URL Without Setting a 301 Redirect
If you publish a post and later realise the URL is not optimised, you can change it. But you must immediately set up a 301 redirect from the old URL to the new one. Without a redirect, every link pointing to the old URL becomes a 404 error and every bit of authority that page had built is lost instantly.
In WordPress, the Redirection plugin manages 301 redirects for free and takes under two minutes to set up per page.
6 Heading Tag Optimisation | How to Structure Your Blog Post for Google and Readers
Heading tags are not just formatting tools. They are structural signals that tell Google how your content is organised, which topics are most important, and whether your article covers a subject comprehensively.
Checklist Item 12: Use One H1 Tag That Contains Your Primary Keyword
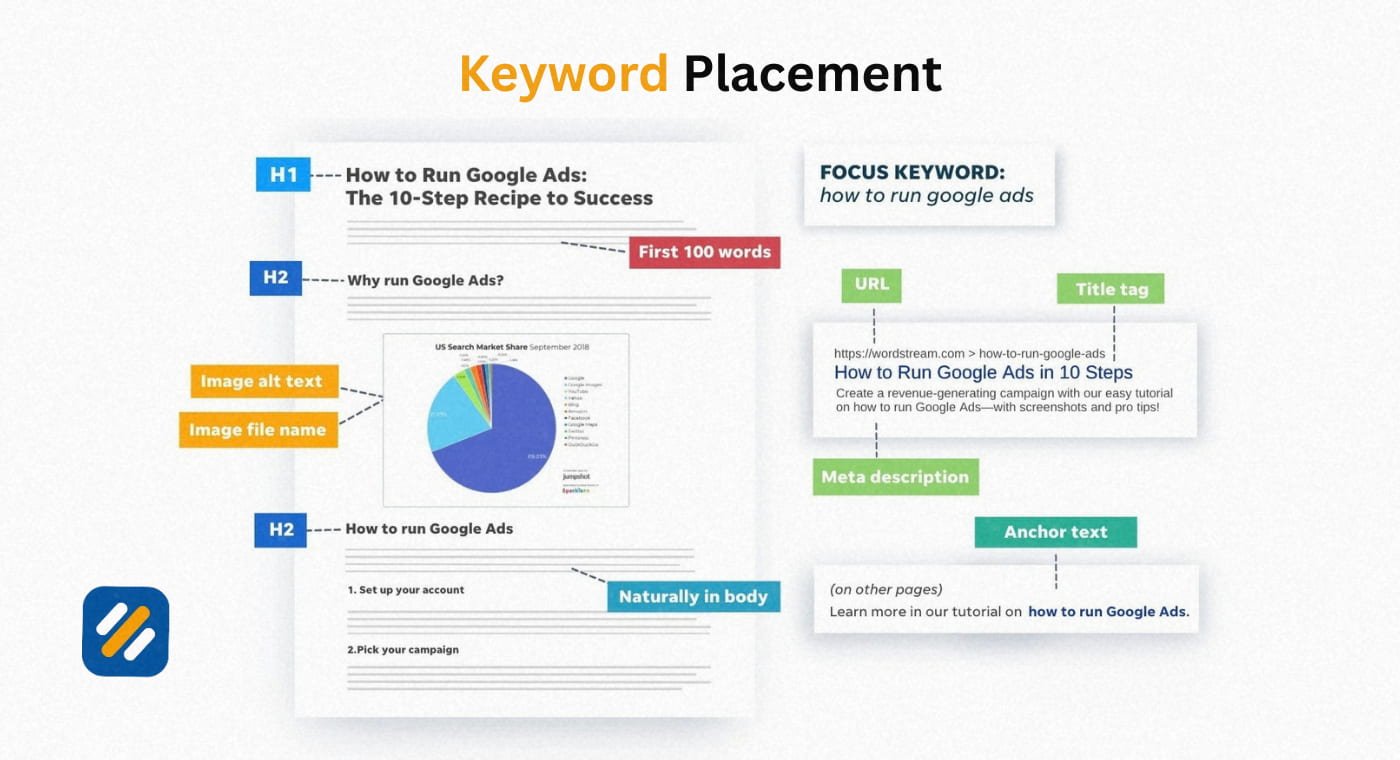
Every blog post should have exactly one H1 heading. In WordPress and most website builders, your post title automatically becomes the H1. Make sure it contains your primary keyword close to the beginning.
Having multiple H1 tags on a single page sends conflicting signals to Google about what the page's main topic is. Check your page's HTML or use a browser plugin to confirm only one H1 exists per post.
Checklist Item 13: Use H2 Tags for Main Sections and H3 Tags for Subsections
Your H2 headings should cover the main topics your blog post addresses. Think of them as the chapter titles of your article. Each H2 should answer a distinct question or cover a distinct aspect of your primary topic.
H3 headings live inside H2 sections and cover specific points within that broader topic. H4s go inside H3s and so on, though most blog posts rarely need to go deeper than H3.
The heading hierarchy Google sees should look like this
H1: Main topic of the page
H2: Major section about one aspect of that topic
H3: Specific point within that section
H3: Another specific point within that section
H2: Next major section
Checklist Item 14: Include Secondary Keywords Naturally in H2 Headings
Your secondary keywords belong in your H2 headings. This is one of the cleanest keyword placement opportunities in any blog post because headings carry more semantic weight than body text and secondary keywords in headings read naturally to the human reader.
7 Keyword Optimisation in Body Content | Getting Density and Placement Right
Keyword optimisation inside your article body is where most beginners either undershoot or overshoot. Undershoot and Google does not understand what the page is about. Overshoot and you trigger keyword stuffing signals that actively harm rankings.
Checklist Item 15: Place Your Primary Keyword in the First 100 Words
Your primary keyword must appear in the opening paragraph of your blog post, ideally within the first 100 words. This placement tells Google immediately what the page is about and confirms the relevance of your title tag.
You do not need to force it. Write your opening paragraph to naturally answer what your primary keyword is asking and the keyword will appear organically.
Checklist Item 16: Maintain 1% Keyword Density Throughout the Article
For a 1,500-word blog post, your primary keyword should appear approximately 15 times across the full article. This works out to roughly once per 100 words which reads naturally when distributed across an article of that length.
Do not count keyword appearances while writing. Write naturally, then use a tool like Rank Math's content analysis or Yoast SEO to check your keyword density after drafting. Both tools show you the exact count and flag if you are under or over the recommended range.
Checklist Item 17: Plant Secondary Keywords Naturally in Supporting Paragraphs
Secondary keywords belong in your supporting paragraphs, not clustered together and not forced into sentences where they sound unnatural. Read your paragraph out loud after adding a secondary keyword. If it sounds like you added a keyword to a sentence rather than wrote a sentence that happened to contain a keyword, rewrite it.
8 Image SEO Checklist | The On-Page Element Most Bloggers Completely Skip
Image SEO is consistently the most skipped section of any blog post SEO checklist. This is unfortunate because image optimisation gives you multiple ranking opportunities beyond the main search results including Google Images and AI Overview visual citations.
Checklist Item 18: Write Descriptive Alt Text for Every Image
Alt text is a written description of an image stored in the page's HTML code. Screen readers use it to describe images to visually impaired users. Google uses it to understand what an image shows and how it relates to the surrounding content.
Weak alt text: "image1.jpg" or "screenshot"
Strong alt text: "on-page SEO checklist showing title tag optimisation steps in Rank Math"
Every meaningful image in your blog post needs descriptive alt text that includes a relevant keyword where it reads naturally. Decorative images like dividers or background shapes can have empty alt text since they convey no information.
Checklist Item 19: Compress Every Image Before Uploading
Uncompressed images are one of the most common causes of slow page load speed. A single uncompressed PNG screenshot can be 3 to 5MB. After compression, the same image is typically 150 to 400KB with no visible quality difference.
Use TinyPNG or Squoosh to compress images before uploading to WordPress. If you have already uploaded images uncompressed, the free Smush plugin can compress your entire media library in one click.
Checklist Item 20: Use Descriptive File Names Before Uploading
The file name of your image is another keyword placement opportunity most bloggers waste. Uploading a file named "screenshot-2026-09-22.png" tells Google nothing. Uploading the same file as "on-page-seo-checklist-rank-math.png" tells Google exactly what the image shows and reinforces the page's topical relevance.
Rename image files on your computer before uploading them to WordPress. Use hyphens to separate words and include a relevant keyword where it fits naturally.
9 Internal Linking | The On-Page SEO Task That Multiplies Your Entire Site's Authority
Internal linking is one of the highest-return SEO activities available to any blogger and one of the most consistently underused. Every internal link you add to a blog post does three things Simultaneously: it helps users discover more relevant content, it distributes authority from strong pages to weaker ones, and it tells Google how your content is connected and how comprehensively you cover your niche.
Checklist Item 21: Add at Least 3 Internal Links to Every Blog Post
Every blog post should link to at least three other relevant posts or pages on your website. These links should be genuinely helpful to the reader, meaning they should point to content that expands on something mentioned in the current post.
A post about on-page SEO checklists naturally links to posts about keyword research, title tag optimisation, and meta description writing. A post about technical SEO naturally links to posts about page speed and Google Search Console. The connections should feel logical to the reader, not forced.
Checklist Item 22: Use Descriptive Anchor Text, Never Generic Phrases
Anchor text is the clickable text of an internal link. "Click here" and "read more" are the two most common and most wasteful forms of anchor text in blogging. They tell Google nothing about the destination page.
Descriptive anchor text like "keyword research guide" or "how to fix crawl errors" tells Google exactly what the linked page covers and adds another relevance signal to that destination page. Always use anchor text that describes the destination.
Checklist Item 23: Link Back to Your New Post From Older Related Posts
When you publish a new post, go back to two or three older posts on related topics and add an internal link to your new article. This passes authority from your established indexed pages to your new post and helps Google discover and index it faster.
This is the internal linking habit that most SEO guides skip but that makes a measurable difference to how quickly new content starts ranking.
10 Content Quality and E-E-A-T Signals | What Google Is Really Looking For in 2026
Technical on-page SEO elements like title tags, URLs, and keywords are necessary but not sufficient. Google's quality systems evaluate your content for genuine expertise, real experience, and trustworthiness alongside the technical signals.
Checklist Item 24: Add Personal Experience or First-Hand Knowledge
Google's E-E-A-T framework (Experience, Expertise, Authoritativeness, Trustworthiness) rewards content written by people with genuine first-hand experience of the topic they are covering. The first "E" for Experience was added to the framework in 2022 specifically to distinguish between content written by practitioners and content written by people who only read about the topic.
In every blog post, include at least one piece of first-hand knowledge that only someone who has actually done this work could include. A specific client result, a tool setting you discovered through trial and error, a mistake you made and corrected. These details are what Google and readers cannot find anywhere else.
Checklist Item 25: Include Data, Statistics, or Research to Support Claims
Every specific claim in your blog post should be backed by data, a named study, or a credible source. "Most websites have crawl errors" is weak. "In a study of 50,000 domains, Semrush found that over 68% had crawl errors affecting rankings" is authoritative.
Named sources and specific figures build trust with readers and signal to Google that your content is researched, accurate, and worth recommending.
Checklist Item 26: Update the Published Date When You Refresh Old Content
Google's freshness signal rewards recently updated content for time-sensitive topics. When you update an existing blog post with new information, new examples, or corrected data, update the published date to reflect the most recent revision.
Do not update the date without actually updating the content. Google is sophisticated enough to detect cosmetic date changes on unchanged content and may discount them.
11 Schema Markup | The On-Page SEO Element That Unlocks Rich Results
Schema markup is structured data added to your page's HTML that gives Google additional context about what your content contains. It is what enables rich results in Google search, the enhanced listings that show star ratings, FAQ dropdowns, how-to steps, and article information directly in the search results page.
Checklist Item 27: Add Article Schema to Every Blog Post
Article schema tells Google that your page is a blog article and includes structured information about the author, publish date, and headline. Rank Math SEO for WordPress adds Article schema automatically to all blog posts when correctly configured.
Go to Rank Math then Schema in your WordPress dashboard and confirm that Article or BlogPosting schema is set as the default for your post type.
Checklist Item 28: Add FAQ Schema to Posts With Question and Answer Sections
If your blog post includes a section with questions and answers, adding FAQ schema gives Google the information it needs to display those questions as expandable dropdowns directly in search results. This significantly increases your page's visual footprint on the SERP and can drive additional clicks from people who see the FAQ but were going to scroll past your regular listing.
In Rank Math, add FAQ schema by going to the Schema tab in the post editor, selecting FAQ Page, and entering your questions and answers in the structured fields provided.
| Schema Type | When to Use It | Rich Result It Enables |
|---|---|---|
| Article | Every blog post | Author, publish date, headline in results |
| FAQ | Posts with Q and A sections | Expandable questions directly in SERP |
| How-To | Step by step tutorial posts | Numbered steps displayed in SERP |
| Breadcrumb | All posts on multi-level sites | Clean breadcrumb path shown in SERP |
| Review | Product or tool review posts | Star ratings shown in search results |
| Local Business | Location or contact pages | Map, hours, address in SERP |
12 Technical On-Page Checks | The Final Pre-Publish Checklist
Before publishing any blog post, run through these final technical checks. They take under five minutes and prevent the most common technical errors that cause newly published content to underperform.
Checklist Item 29: Check Your Page Speed Score Before Publishing
Go to pagespeed.web.dev and test your page URL after publishing a draft or staging version. Aim for a score of 85 or above on mobile. If your score is significantly lower, the most common causes are uncompressed images, too many plugins loading external scripts, and unminified CSS files.
On WordPress with Rank Math and WP Rocket, most blogs can achieve mobile scores between 85 and 95 with minimal configuration. If you are not using a caching plugin, install WP Super Cache for free and enable basic caching before publishing.
Checklist Item 30: Confirm the Post Is Set to Index in Rank Math
Check that your blog post is not accidentally set to noindex before publishing. In Rank Math, look at the Advanced tab in the post editor and confirm that "robots meta" is set to Index. A single noindex tag on a published post removes it from Google's index entirely, no matter how well optimised the content is.
Checklist Item 31: Preview the Post on Mobile Before Publishing
Google uses mobile-first indexing, meaning it evaluates and ranks your website based on the mobile version of your pages. Open a preview of your post on your phone before clicking publish. Check that the text is readable without zooming, images are not cut off at the edges, and any tables are horizontally scrollable rather than broken across multiple lines.
Checklist Item 32: Set a Canonical Tag If the Content Exists Elsewhere
If any version of your blog post content appears on another URL on your website (in a category archive, a tag page, or a paginated version), add a canonical tag pointing to the main post URL. In Rank Math, the canonical URL is automatically set to the post's own URL and only needs to be changed if you have a specific duplication concern.
13 The Complete On-Page SEO Checklist at a Glance
Here is the full checklist in one place for easy reference before every publish:
| Category | Checklist Item | Status |
|---|---|---|
| Pre-Writing | Keyword confirmed with search volume | To Do |
| Pre-Writing | Keyword difficulty checked and suitable | To Do |
| Pre-Writing | Search intent analysed and content format decided | To Do |
| Title Tag | Primary keyword in title within first 4 words | To Do |
| Title Tag | Title under 60 characters | To Do |
| Title Tag | Power word or value signal included | To Do |
| Meta Description | Unique meta description written | To Do |
| Meta Description | Primary keyword included naturally | To Do |
| Meta Description | Under 160 characters with clear benefit | To Do |
| URL | Primary keyword in URL slug | To Do |
| URL | Short, clean, no stop words, hyphens used | To Do |
| Headings | One H1 containing primary keyword | To Do |
| Headings | H2s cover main sections, H3s cover subsections | To Do |
| Headings | Secondary keywords in H2 headings naturally | To Do |
| Keywords | Primary keyword in first 100 words | To Do |
| Keywords | 1% keyword density maintained | To Do |
| Keywords | Secondary keywords planted naturally in body | To Do |
| Images | Descriptive alt text on every image | To Do |
| Images | All images compressed before uploading | To Do |
| Images | Descriptive file names with hyphens | To Do |
| Internal Links | Minimum 3 internal links added | To Do |
| Internal Links | Descriptive anchor text used | To Do |
| Internal Links | New post linked from older related posts | To Do |
| Content Quality | Personal experience or first-hand knowledge included | To Do |
| Content Quality | Data or research cited with sources | To Do |
| Content Quality | Published date updated if content refreshed | To Do |
| Schema | Article schema confirmed active | To Do |
| Schema | FAQ schema added if Q and A section present | To Do |
| Technical | Page speed checked on mobile | To Do |
| Technical | Post confirmed as indexable in Rank Math | To Do |
| Technical | Mobile preview checked before publishing | To Do |
| Technical | Canonical tag set if duplication exists | To Do |
14 3 Expert Tips to Get More From Your On-Page SEO Checklist
These three tips go beyond what most on-page SEO checklists include and make a measurable difference to ranking speed and content longevity.
Expert Tip 1: Optimise for the Featured Snippet From the First Draft
Featured snippets are the boxes that appear above position one in Google results. They are awarded to pages that directly answer a question in a clear, structured format. Write a two to three sentence direct answer to your primary keyword question in the first paragraph of every blog post. Then expand on that answer in the rest of the article. Google can extract that direct answer as a featured snippet even when your page ranks position three or four, effectively giving you position zero visibility.
Expert Tip 2: Use Rank Math's Content AI Score as a Publishing Gate
Before publishing any blog post, do not hit publish until Rank Math's SEO score for that post reaches 80 or above. This single habit ensures every post meets the minimum on-page optimisation standard before going live. A score below 80 means something important is missing. Fix it before publishing rather than planning to fix it later.
Expert Tip 3: Audit Your Top 10 Published Posts Every Six Months
On-page SEO is not a one-time task. Pages that ranked well in 2024 can slip in 2026 if competitors have published better-optimised content on the same topic. Every six months, pull your top 10 posts from Google Search Console, identify which ones have dropped from their peak ranking positions, and run each one through this checklist again. Updating the content, refreshing the keyword placement, adding new internal links, and updating the published date consistently recovers rankings that have drifted.
15 Conclusion
An on-page SEO checklist for every blog post is not about following rules for their own sake. It is about removing every obstacle between your content and the reader who needs it.
Google's job is to find the most useful, most trustworthy, most clearly presented answer to every search query. Your on-page SEO checklist is the process of making sure your blog post is that answer for the keyword you are targeting.
Work through this checklist on every post before publishing. Not just your most important posts. Every single one. The habit compounds. Thirty posts optimised correctly build domain authority, topical credibility, and ranking consistency that no amount of rushed publishing can replicate.
Copy this checklist. Add it to your content workflow. Run every post through it before it goes live.
Have a question about any item on this checklist? Drop a comment below and I will answer it personally.
Join 1,000+ business owners and bloggers who get one actionable SEO tip every week — straight to their inbox. Free forever.
Get Free Weekly Tips →